Creating Points
Path:
Insert | Profile | Point | Point
Insert | Profile | Point | Point...
Insert | Profile | Point | Equidistant Points
Insert | Profile | Point | Intersection Point
Insert | Profile | Point | Projection Point
Located in a fly-out on the Profile toolbar.
Use this to ...
• Create points.
• Create equidistant points.
• Create intersection points.
• Create projection points.
Prerequisites
• You should be in the Sketcher workbench.
• The Sketch tools toolbar must be visible, and Dimensional and Geometrical constraints active.
• All SmartPick options must be active.
Process: Creating a Point by Clicking
1. Select Insert | Profile | Point | Point.
2. In the Graphics window, pick the point.
Or
On the Sketch tools toolbar, enter the H and V values for the point and press TAB. CATIA creates the point and its associated dimensions if specified using the toolbar.
Process: Creating Points Using Coordinates
1. Select Insert | Profile | Point | Point… The Point Definition dialog displays.
2. Click Cartesian or Polar.
3. Enter the coordinates of the point.
4. Click OK to create the point and its associated dimensions.
Process: Creating Equidistant Points – Points and Length
1. Select Insert | Profile | Point | Equidistant Points.
2. In the Graphics window, pick the geometry on which you want to create equidistant points. The Equidistant Point Definition dialog displays.
3. In the New Points text box, enter the number of points.
4. Click OK to create the points.
Process: Creating Equidistant Points – Points and Spacing
1. Select Insert | Profile | Point | Equidistant Points.
2. In the Graphics window, pick the geometry on which you want to create equidistant points. The Equidistant Point Definition dialog displays.
3. Pick the origin point. The Equidistant Points Definition dialog text boxes become selectable.
4. In the New Points text box, enter the number of points.
5. In the Spacing text box, enter the spacing.
6. Click OK to create the points.
Process: Creating Equidistant Points – Spacing and Length
1. Select Insert | Profile | Point | Equidistant Points.
2. In the Graphics window, pick the geometry on which you want to create equidistant points. The Equidistant Points Definition dialog displays.
3. Pick the origin point. The Equidistant Points Definition dialog text boxes become active.
4. In the Parameter list, select Spacing and Length.
5. In the Spacing text box, enter the spacing.
6. In the Length text box, enter the length.
7. Click OK to create the points and dimensions.
Process: Creating Intersection Points
1. Select Insert | Profile | Point | Intersection Point.
2. In the Graphics window, pick the first element to intersect.
3. Pick the second element to intersect. CATIA creates the intersection point and geometric constraints.
Process: Creating Projection Points
1. In the Graphics window, pick the points for projection.
2. Select Insert | Profile | Point | Projection Point.
3. Pick the element for the points to project onto. CATIA creates the points and geometric constraints.
Options
Point Definition Using Cartesian Coordinates
Allows you to specify the point location using Cartesian coordinates. Cartesian coordinates define a point by specifying the horizontal and vertical position relative to a datum.

Point Definition Using Polar Coordinates
Allows you to specify the point location using Polar coordinates. Polar coordinates define a point by specifying a radius and an angle that the point lies on relative to a datum.
Equidistant Points – Parameters
Specifies how to create the specified points.
Points and Length
Creates a number of equidistant points along a specified length. This option is the default when the Equidistant Points Definition dialog displays.
Points and Spacing
Creates a number of points along a specified spacing. This option is only available after you pick a start point.
Spacing and Length
Creates a number of points along a specified spacing and length. This option is only available after you pick a start point.
Projection Point
When this option is active, two projection methods are available on the Sketch tools toolbar.
Orthogonal Projection
Projects the point in a direction that is perpendicular to the target curve object.
Along a Direction
Projects the point in a direction that you specify by entering H, V, and Angle data.
Wednesday, March 19, 2008
Creating Points
Tuesday, March 18, 2008
Frequently Asked Questions
1. Can I modify the sketch directions and origin?
A: Yes, you can modify all the sketch definitions by picking the sketch in the Specification Tree and selecting Edit
 The Sketch tools toolbar (select View | Toolbars | Sketch tools) is invaluable when creating sketch geometry.
Click Here to Download Sketch Tools Movie
The toolbar enables you to automatically create constraints, and it changes to display the coordinates, lengths, and other information in the context of command you are using. The Sketch tools toolbar also provides feedback as you dynamically move the cursor in the Graphics window, showing you the current length of a line or the diameter of the circle. This information is helpful because sketches are much easier to constrain when the initial geometry is drawn close to the desired size. Additionally, toolbar functions allow you to snap the curves to a grid and create construction geometry. The Sketch tools toolbar has several distinct areas. The first section contains: Grid, Snap to Point, Construction/Standard Element, and Geometrical and Dimensional Constraints. These first five commands are always present and are the same, regardless of the active sketch command.
 The next section contains options that vary, depending on what geometry you are creating or what command you are using to modify your existing geometry. For example, when creating a line, the Sketch tools toolbar displays several different text boxes.
  Initially, the toolbar allows you to specify the H (horizontal) and V (vertical) start coordinates. Then the toolbar changes to display the end coordinates. The length of the line and the angle text boxes display at all times while the line command is active.
  The Sketch tools toolbar for creating a sketch chamfer has options for how to trim the selections. After you select the geometry, the toolbar displays text boxes for the offset(s) and/or the angle.
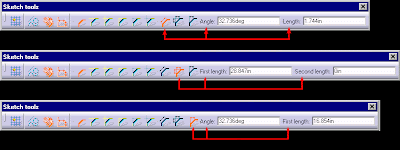 You can simply click in the text boxes and enter the values or press TAB to cycle to the next text box. When you finish an entry, press TAB to accept the value. After specifying all the values for a particular geometric parameter, like an endpoint, CATIA modifies the text boxes in the toolbar, allowing you to enter the next piece of geometric information. The advantage in using the Sketch tools toolbar, instead of picking in the Graphics window, is that dimensional constraints are applied automatically to the geometry. Grid
 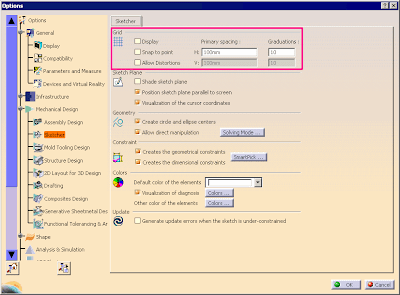 This option creates a visual grid on which you create sketches. Turn this option on by clicking Grid on the Sketch tools toolbar. Other grid options are set under Tools | Options. Snap to Point Locates curve endpoints onto the grid points.
Click Here to Download Grid Option Movie
Construction/Standard Element Creates sketch geometry using any of the creation modes described below. This geometry is used to create solids and surfaces. When the icon is active (highlighted), any new geometry is created as construction geometry. Construction geometry is gray by default, has a dashed line type, and does not display outside the Sketcher workbench. You can convert from standard to construction elements and vice versa by selecting existing curves and then changing the status of the Construction/Standard Element icon. Geometrical Constraints Creates automatic geometric constraints in conjunction with SmartPick when creating geometry. When deactivated, geometric constraints are only applied at the time of creation. After you draw curves, CATIA does not save the constraints. It is very likely that that this will be active all of the time. Dimensional Constraints Creates automatic dimensional constraints when entering values in the Sketch tools toolbar to create exact geometry. It is very likely that that this will be active all the time. Tips • Roughly create the profile you need. Then use dimensional and geometrical constraints to finalize the profile. • When creating a continuous profile, you can activate the Tangent Arc command by clicking and dragging the cursor away from the endpoint of the line. Release to activate the Tangent Arc command.
Monday, March 17, 2008
Creating Sketches
Creating Sketches 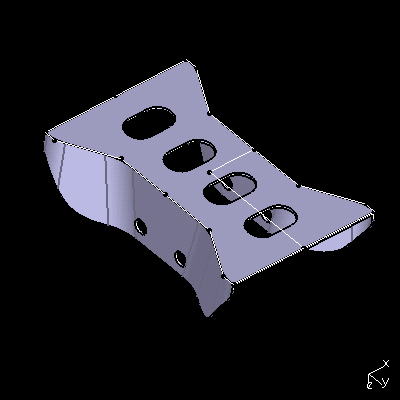
Path: Insert Sketcher SketchInsert Sketcher Positioned Sketch
Located on the Sketcher toolbar.
Use this to ...
Create a new sketch.
Key Points
In CATIA, there are two ways to create a sketch: Sliding (also known as a Non-positioned sketch) and Positioned. In a sliding sketch, you do not have control over the origin or orientation. This can lead to potential errors in your model, such as, if base sketches update, later sketches can become out of place. It is good modeling practice that all the sketches you create are positioned sketches. However, you can update a non-positioned sketch to a positioned sketch.
Process: Creating a Sliding Sketch (Non-positioned Sketch)
1. Select Insert Sketcher Sketch. CATIA prompts you to pick a face or plane.
2. In the Graphics window, pick the sketch placement face to activate the Sketcher workbench.
3. On the Workbench toolbar, click Exit Workbench to return to the modeling application.
Process: Creating a Positioned Sketch 
Click Here to Download Positioned Sketch Movie
1. Select Insert Sketcher Positioned Sketch. The Sketch Positioning dialog displays.
2. In the Graphics window, pick a placement face. CATIA projects the sketch origin onto the selected plane or face origin.
3. In the Origin Type list, select the origin definition method. 
In the Graphics window, pick the geometry to define the origin.
4. In the Orientation Type list, select the orientation method options. In the Graphics window, pick the geometry to define the orientation.
5. Click OK to create the sketch.
6. On the Workbench toolbar, click Exit Workbench to return to the modeling application.
Options
Sketch Positioning 
Defines the two options for creating a sketch.
Positioned Defines the sketch by selecting a planar face or plane, or by defining two axes. A positioned sketch allows you to define the origin and the reference direction. Using existing edges as references for the sketch direction means the directions update if you modify the underlying edges. Using a positioned sketch is the recommended method of creating a sketch.
Sliding Creates a non-positioned sketch. The default origin and directions of the selected plane or face define the origin and direction of the sketch. Sliding sketches can be updated to positioned sketches by selecting new reference directions.
Origin
Click Here to Download Sketch Origin Movie
These options define the methods to position the origin of the sketch.
Implicit Defines the origin as the default origin of the face or plane. Selecting two lines places the origin at the intersection of the two lines. The H direction is collinear with the first line; the second line only defines the side on which the V direction is created, not the orientation.
Part Origin Defines the sketch origin as the absolute origin of the part.
Projection Point Defines an origin by projecting a point onto the sketch positioning face or plane.
Intersection 2 Lines Defines the origin at the intersection of two lines.
Curve Intersection Defines the origin at the intersection of two curves.
Middle Point Defines the origin at the mid-point of a line or edge.
Barycenter Defines the origin at the center of a face.
Orientation 
Click Here to Download Sketch Orientation Movie
Defines the H and V directions of the sketch. When defining the direction, you can control either the H or V direction. You also have the ability to reverse the direction.
Implicit Defines the sketch directions as the default directions of the sketch support.
X Axis Defines the active direction along the X-axis.
Y Axis Defines the active direction along the Y-axis.
Z Axis Defines the active direction along the Z-axis.
Components Defines the active direction by entering vector components.
Through Point Defines the active direction as the vector through a point.
Parallel to Line Defines the active direction as parallel to a selected line.
Intersection Plane Defines the active direction as the line created by the intersection of two planes.
H Direction Lets you define the H direction of the sketch.
V Direction Lets you define the V direction of the sketch.
Reverse H Reverses the H vector.
Reverse V Reverses the V vector.
Swap Swaps the H and V directions.
Sunday, March 16, 2008
Sketch Design
Sketcher Overview
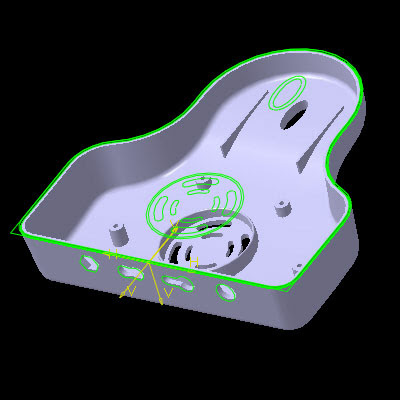
Click here to download Sketcher Introduction Movie
Overview: Sketcher enables you to create parametric, planar geometry on faces and planes. After you draw the geometry, you use the sketch to create pads, pockets, shafts, and surface geometry.
Sketches
Sketches are sets of 2D, fully-parametric curves. In a typical sketch, you first create base curves, and then add geometric and dimensional constraints to control the size and shape of the curves. By adding these constraints to the sketch curves, you can capture and define your design intent. This approach makes it much easier to modify the sketch shape later.
Sketch Usage
Sketches are commonly used to define section curves for pads, pockets, shafts, grooves, or surface geometry. Sketches maintain associativity to their parent and child features. If you change the geometry in a sketch, the solid model changes accordingly. Similarly, if a plane or face changes orientation or moves, any sketches attached to that plane or face move with it. You can also add dimensional and geometric constraints to the sketch. Using dimensional constraints, you can create system-defined expressions and link them to other sketch dimensions or to other features of the solid.Using Sketcher intelligently allows you to quickly modify the model to reflect changes during the product life cycle.
Sketch Placement
You create sketches on a plane or solid planar face. A sketch remains associative to its placement face. If the face changes orientation or location, the sketch changes with it.When you pick a plane or face as the sketch plane, CATIA sets the horizontal and vertical directions as the main axis of the selected plane. You can manually control the horizontal and vertical directions by selecting the horizontal and vertical reference edges, and the placement face, before creating the sketch.
Sketch Management
Organizing the data within a CAD file is always important when different people are potentially going to use the data. Data organization is especially important when using sketches because you can define sketch information in many geometrical sets, with different sketch names. Depending on the complexity of a design, even a simple, single solid model can contain over 20 sketches. With this amount of data, it is prudent to use good techniques to manage your sketches.CATIA automatically makes a sketch invisible once you use it to create a feature, such as a pad or pocket. However, it is a good practice to place each sketch into a geometric set. This makes it easier to find the information required in the Graphics window. It is also advantageous to give each sketch a descriptive name by editing the properties of the sketch.
Tips
· Always assign the In Work object to the appropriate geometrical set before creating a sketch. Although you can move objects, it may be easier to initially create objects in the correct location.
Saturday, March 15, 2008
Method For Extending A Sketch Profile Into A solid In CatiaV5
Options
Type
Defines the method for extending the sketch profile into a solid.
Dimension
Creates a pad at a set length.
If the model updates, the pad always remains at the specified dimension value.
Up to Next
Creates a pad to the next face that encloses the pad profile. With this option, if the limiting face moves, the pad height updates to the new
limiting face location.

Up to Last
Creates a pad to the last face that encloses the pad profile in the model. The pad height is parametric, which means if the position of the
limiting face moves, then the pad updates to reflect the change.
Up to Plane
Creates a pad to a selected plane.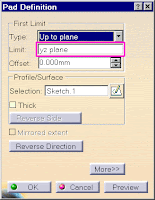
You can pick both reference planes and existing faces. The advantage of this option is that the selected face does not have to enclose the
pad profile for the pad to stop.
By moving the selected plane or selecting a new plane, the pad updates to reflect the change.
Friday, March 14, 2008
SmartPick for sketch in CATIAV5
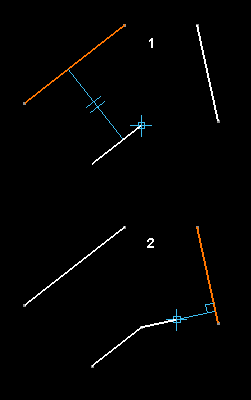
Overview: As you work with the sketcher there are several onscreen hints that you will want to look for as you define your profile. This feedback will come from a tool called SmartPick. SmartPick will help you to reduce the design time involved in creating sketches.
SmartPick Coincidents
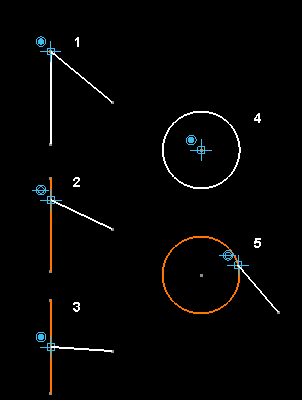
SmartPick allows you to pick endpoints, arc centers, midpoints, intersections, and other control points. Catia will display different symbols next to your cursor as you create sketch geometry. The symbol displayed will help you determine if you have the proper coincident constraint, (profile connections).
The symbols displayed in the Graphics window show what coincident constraints will be created on the geometry. In the following graphic, figure 1 shows a coincident endpoint connection. Figure 4 shows a coincident connection to the arc center of the circle. Figure 3 shows a coincident connection to the midpoint of the highlighted element. Point connections have a filled symbol. Figures 2 and 5 show a coincident connection to the element highlighted. Element connections show an open symbol.
SmartPick Alignments
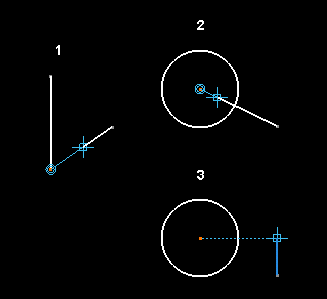
SmartPick can also help you to identify when you are in an alignment with other elements near your cursor. Catia displays alignments using a thin dashed line. Sometimes the line may appear to be continuous because of the way the workstation renders the image.
SmartPick Geometric Relationships/Constraints
SmartPick can also help you to define geometric relationships between elements. These include parallelism, perpendicularity, and tangency.

In the following graphic, the first figure shows only an alignment. Figure 2 shows that the line is also horizontal, (parallel to the horizontal axis of the sketch). The horizontal orientation is indicated by SmartPick with the change in color, (the default is blue). Both horizontal and vertical use a change in color to indicate the proper orientation.
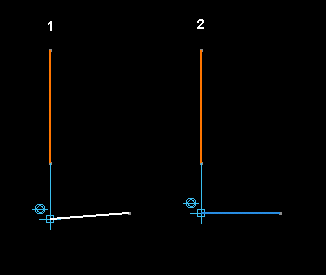
The next graphic shows the parallel and perpendicular relationships. Notice that the relationship is defined relative to the highlighted element. The relationship symbols displayed in the Graphics window correspond to the constraint symbol.
The creation of constraints is dependant on Geometrical Constraints being active on the Sketch Tools toolbar; however, the relationship with other geometry will still be recognized by SmartPick even if Geometrical Constraints is not active, but no constraint will be created.

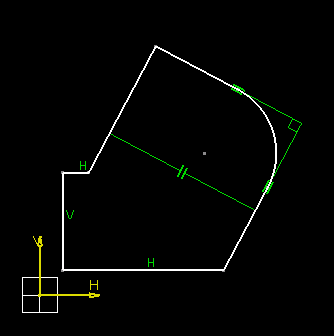
The following symbols display on the geometry after creation to show what geometric constraints exist.
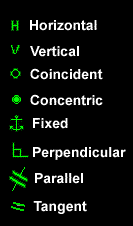
The following graphic shows the completed profile with the geometric constraint symbols displayed.
SmartPick Options

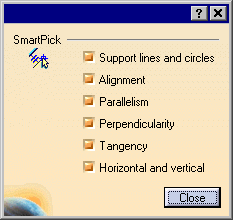
SmartPick recognition settings are available from Tools | Options, Mechanical Design, Sketcher, SmartPick.
Tips
• To temporarily deactivate SmartPick, hold SHIFT.
• To lock a displayed relationship or alignment, hold CTRL after the symbol displays. You can now move your mouse and maintain the relationship.